Automation plays a crucial role in optimizing business processes. It reduces manual effort, minimizes errors, and allows employees to focus on strategic tasks instead of repetitive ones.
Odoo provides powerful automation tools that let you streamline workflows, often without writing a single line of code. With a basic understanding of the system's structure, you can start creating effective automations.
Types of Automation in Odoo
There are two primary types of automation in Odoo:
- Automation Rules
These are trigger-based rules. They run when a specific event happens (e.g., when a sales order is confirmed, a record’s status is changed, etc.).
They can be configured entirely through the user interface without any coding, making them perfect for non-technical users. - Scheduled Actions
These are time-based actions that run at predefined intervals (daily, weekly, monthly, etc.).
Scheduled actions typically execute Python code and are usually defined in the codebase.
They are used for recurring tasks like fetching incoming emails, cleaning up data, or sending periodic reports.
In this post, we'll focus on Automation Rules.
How to Configure Automation Rules
To access automation options, activate Developer Mode and navigate to: Settings > Technical > Automation
If the Automation Rules menu is not visible, check whether the module is installed. You can find and install it via the Apps menu by searching for Automation Rules.
Step 1: Create a New Automation Rule
To create new automation rules, the following steps are required:
- Go to
Settings > Technical > Automation > Automation Rules - Click New and add a name for your rule.
- Select the model the rule applies to, e.g., Sales Order, Purchase Order, etc.
Tip: If you're unsure of the model name:
- Open a record from the model you want to automate (e.g., Invoices).
- Click on the
Developer Tools icon at the top right (Developer Mode enabled). - Under the
Interface section, you’ll see the model name (e.g., account.move for Invoices).
Step 2: Define Rule Conditions
Once you’ve selected the model, a few fields will appear that need configuration:
-
Trigger
Define when the rule should run (e.g., when a sales order’s status changes to "Sales Order"). -
Before Update Domain
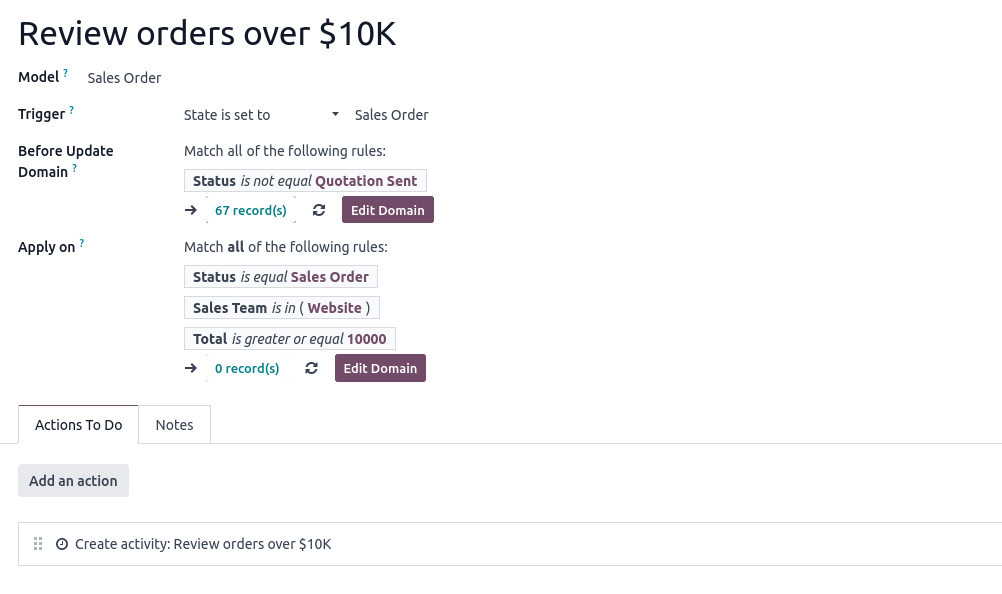
Specify conditions based on the record's values before the trigger occurs.For example, consider only orders that had the state "Quotation" before changing to "Sales Order," and exclude those that moved from "Quotation Sent" to "Sales Order."
This option is not available when the trigger is
Time Condition. -
Apply On
Specify conditions applied after the trigger occurs. For example, filter records where the state is "Sales Order."
If the trigger doesn’t influence the value checked in the condition, it makes no difference whether you place the condition in Before Update Domain or Apply On.
For instance, if the Sales Team is "Website" both before and after the status change, it can be added in either condition group, the result will be the same.
Step 3: Set Up Actions
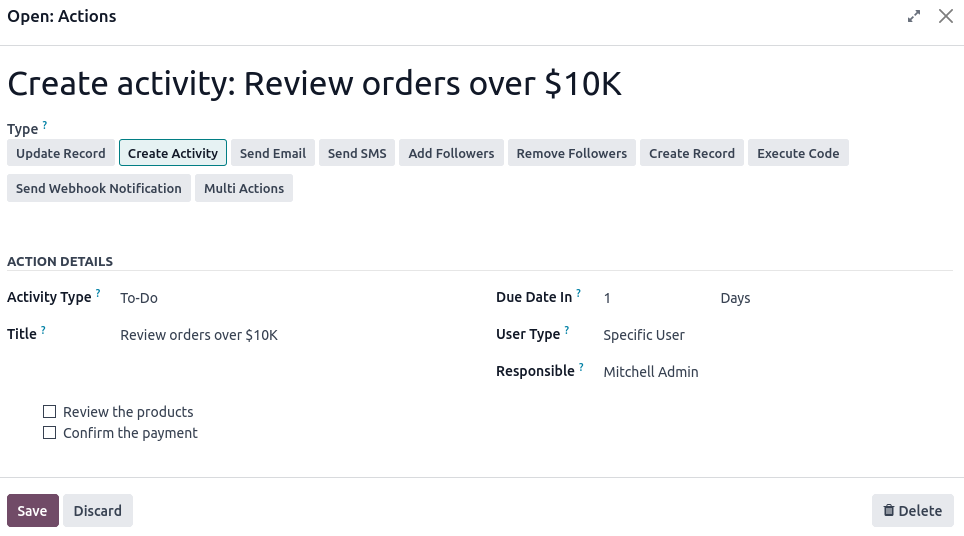
The next step is to define what the system should do when the conditions are met. This is configured under the Actions To Do tab. It is possible to configure multiple actions for a single rule. Available options include:
- Update Record
- Create Activity
- Send Email
- Send SMS
- Add/Remove Followers
- Create Records
- Execute Code
- Send Webhook Notification
- Multi Actions
Depending on the action selected, different configuration fields will appear for each of them.
Practical Use Case
Scenario
An e-commerce company has an internal rule that all website orders with a value over $10,000 must be reviewed by the sales manager. Orders previously sent as quotations to customers don’t require review.
To support this rule, the system needs to automatically create an activity for the sales manager listing the necessary tasks for review.
Automation Rule Configuration
The configuration for the required rules that support the company's requirements is shown in the images below.

Result
Every time a qualifying sales order is confirmed, an activity will be automatically created for the assigned sales manager to review.
Final Thoughts
Odoo’s built-in automation features offer a practical and accessible solution without the need for advanced technical knowledge.
By setting clear conditions and actions, you can significantly reduce manual work, improve accuracy, and ensure process consistency.
